
you’re probably leaving performance on the table right now, and it has nothing to do with your GPU or CPU, your RAM is the problem, and the fix takes about 30 minutes.
i’ve watched people drop $800 on a new graphics card when their real bottleneck was a single BIOS setting they never touched. wild, but it happens all the time.
this guide covers the best ram settings for fps, starting with the free stuff that takes five minutes, then moving to the tweaks that actually matter. no snake oil, no placebo, just measurable performance gains.
Why your RAM is killing your FPS (and you don’t even know it)
The performance you’re leaving on the table
here’s what most people don’t realize: when you install RAM, it doesn’t run at the speed printed on the box. that fancy DDR5-6000 kit? it’s probably running at 4800. that DDR4-3600? probably stuck at 2666.
manufacturers do this for compatibility, but it kills performance. enabling one setting in your BIOS can unlock around 5-15% more FPS in CPU-bound games, sometimes more on badly configured systems. the benchmarks are consistent across dozens of titles.
How RAM actually affects gaming
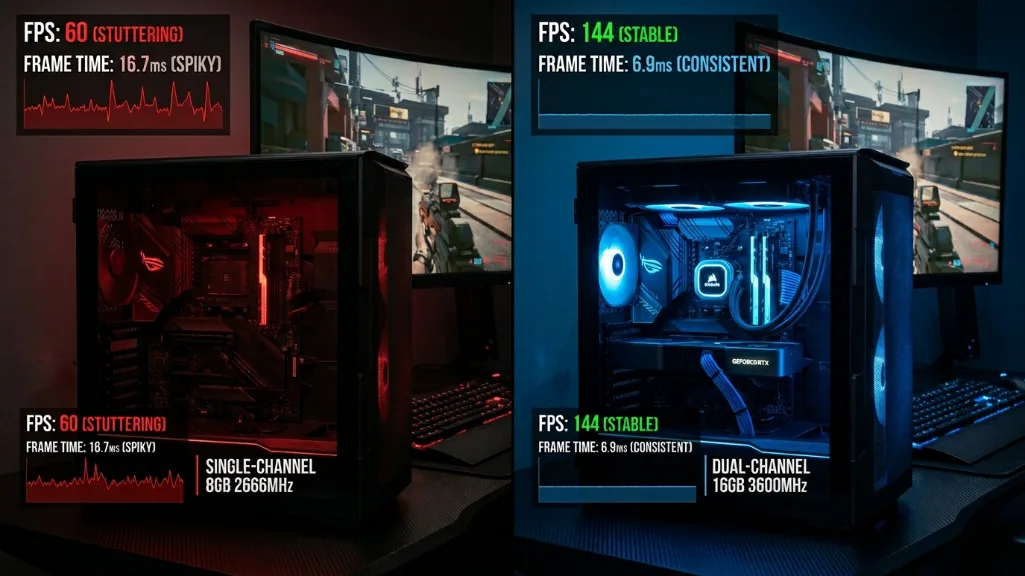
your CPU needs constant data flow to render frames. when RAM is slow or misconfigured, the CPU sits there waiting for textures, game logic, and assets instead of doing its job. this waiting time shows up as stuttering, inconsistent frame times, and those annoying hitches that ruin competitive matches.
the worst part? your average FPS might look fine, but your 1% lows the frames that actually make games feel choppy take a bigger hit. i’ve seen systems gain 15-30% on their 1% lows just by fixing RAM configuration on CPUlimited scenarios. same hardware, zero cost.
The 2026 context: why optimizing matters more than ever
RAM prices have gone absolutely insane. DDR5 kits have roughly doubled in price compared to late 2025 in many regions, AI companies are eating up all the DRAM production, and it’s not getting better anytime soon.
this means upgrading isn’t realistic for most people right now. optimizing what you already have just became critical.
The 5 minute fix: enable XMP/EXPO right now
What XMP and EXPO actually do
XMP (intel) and EXPO (AMD) are one click overclock profiles stored on your RAM sticks, they contain tested settings for speed, timings, and voltage that unlock your RAM’s advertised performance.
without these enabled, you’re running at JEDEC defaults basically the slowest, safest speed that guarantees compatibility with everything. enabling XMP/EXPO is literally the difference between driving a sports car in first gear versus actually using the engine.
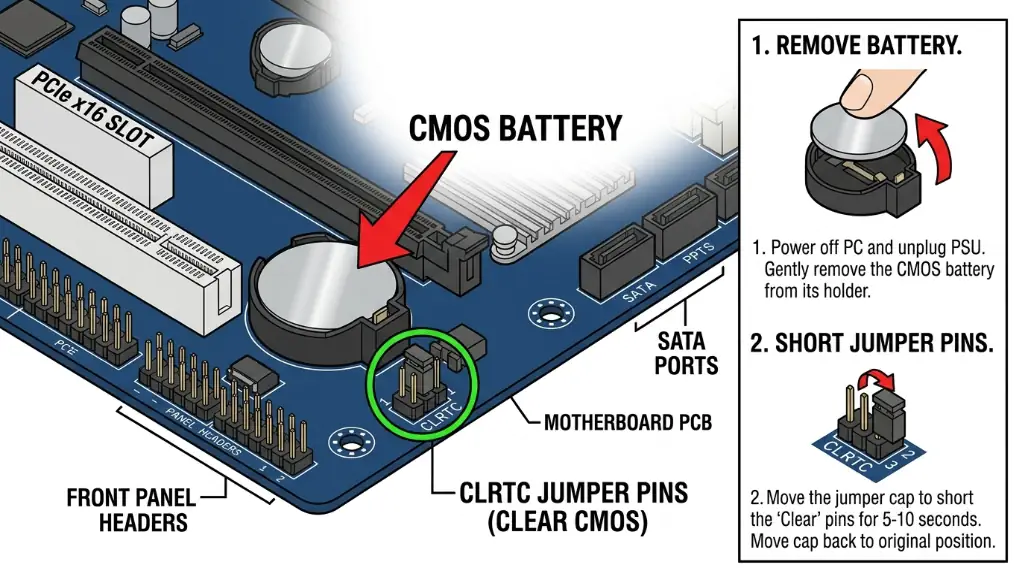
quick safety note: XMP and EXPO are technically overclocking, which means they push your RAM beyond the base spec, most systems handle this fine since the profiles are tested by the manufacturer, but some configurations can be unstable. if your PC won’t boot after enabling XMP/EXPO, don’t panic just clear the CMOS by removing your motherboard’s battery for 30-60 seconds, or use the clear CMOS button/jumper if your board has one. this resets everything to defaults so you can try again with lower settings.
Step-by-Step BIOS setup
restart your PC and spam the DELETE or F2 key during boot. you’ll land in the BIOS.
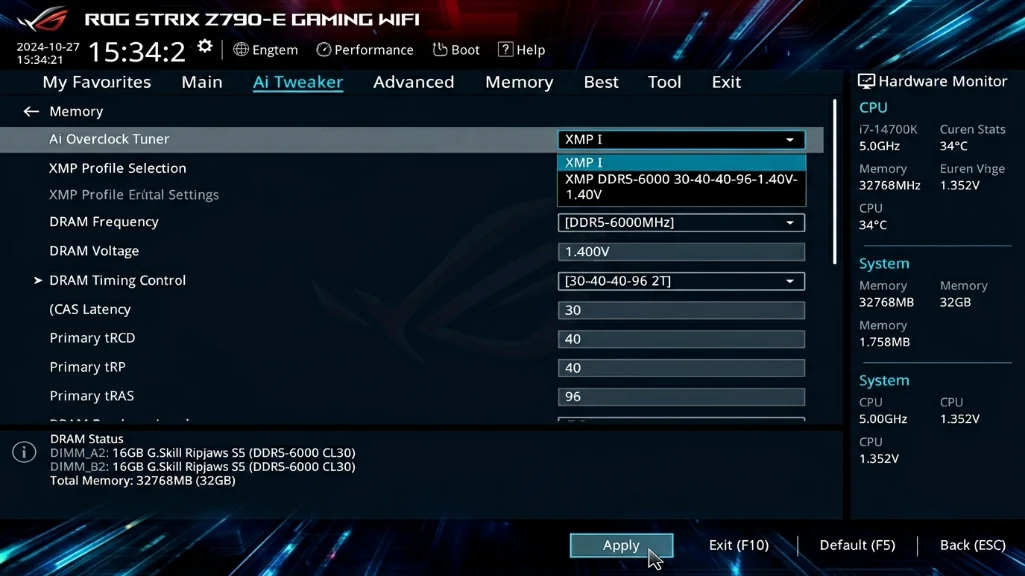
for ASUS motherboards: look for “AI Tweaker” or “D.O.C.P.” in the main menu, you’ll see a dropdown that says “disabled” or “auto.” change it to “profile 1” or “enabled.” that’s it.
for MSI boards: go to the OC tab, find XMP/EXPO, and switch it to “profile 1.”
for Gigabyte: navigate to M.I.T. or “advanced memory settings” and enable the XMP profile.
for ASRock: look for “OC tweaker,” then “load XMP setting.”
press F10 to save and reboot, done.
How to verify it’s working
once you’re back in Windows, press CTRL + SHIFT + ESC to open task manager, click the performance tab, then memory. the “speed” field should now show your RAM’s advertised speed 3600 MHz, 6000 MHz, whatever’s on the box.
if it still shows the old speed, you either didn’t save the BIOS changes or your motherboard doesn’t support that speed. try reducing it by one step in BIOS (6000 → 5600, for example).
Dual channel RAM: The biggest performance boost you’re missing
Single vs dual channel performance
here’s where things can get dramatic. running RAM in single-channel mode one stick instead of two literally cuts your memory bandwidth in half.
the performance impact varies wildly depending on the game and your system, but it can be brutal in memory-sensitive titles:
- cyberpunk 2077: can see 10-20% average FPS loss in CPU-limited scenarios, with 1% lows taking an even bigger hit
- marvel rivals: this one’s an outlier that hammers memory bandwidth hard some benchmarks show 30-50% differences
- space marine 2: typically around 10-20% average FPS loss in CPU-bound situations
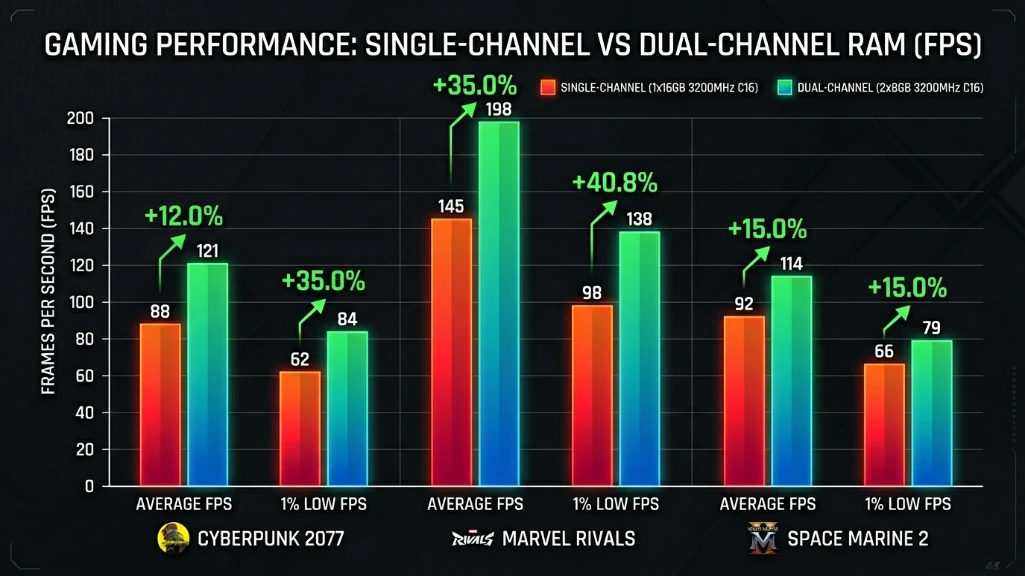
these aren’t universal across all games. GPU-limited scenarios at 4K or max settings see much smaller differences. but in 1080p high-refresh gaming where the CPU actually matters? dual-channel can make or break your experience.
How to check if you’re running dual channel
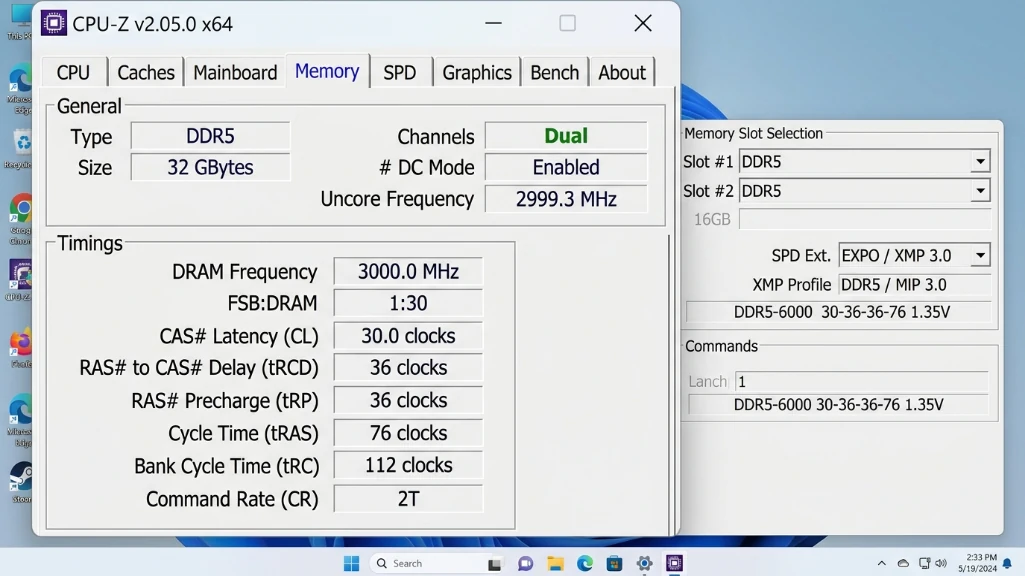
download CPU-Z (it’s free). open it and click the “memory” tab. look for the “channels” field. it should say “dual.” if it says “single,” you’ve found your problem.
The right way to install RAM sticks
if you have a 4-slot motherboard, you can’t just put RAM in any two slots. most boards use slots 2 and 4 (labeled A2 and B2) for dual-channel, slots 1 and 3 won’t work.
check your motherboard manual, but the general rule is: skip a slot between sticks. if you only have two slots total, fill both.
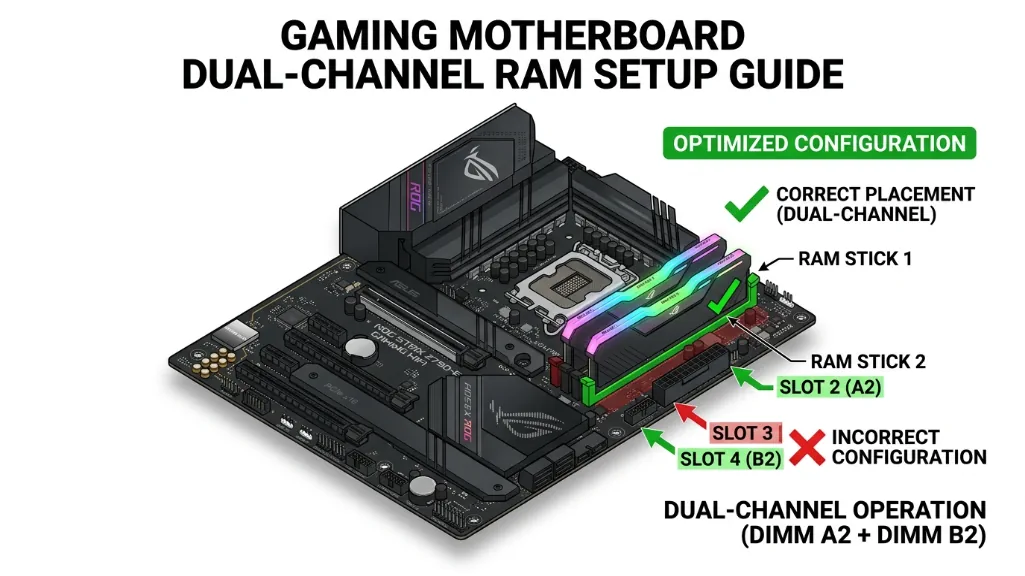
i’ve seen people running single-channel for months because they put both sticks right next to each other in slots 1 and 2. don’t be that person.
RAM timings: when they matter (and when they don’t)
Understanding CL, tRCD, tRP
RAM timings are those four numbers you see on product pages: 16-18-18-38 or 30-36-36-76. the first number (CL or CAS latency) is the most important it’s how long your RAM takes to respond to the CPU.
lower numbers are faster, but here’s the thing: the difference between CL30 and CL32 at the same speed is maybe 2-3% in real gaming. frequency matters way more than tight timings.
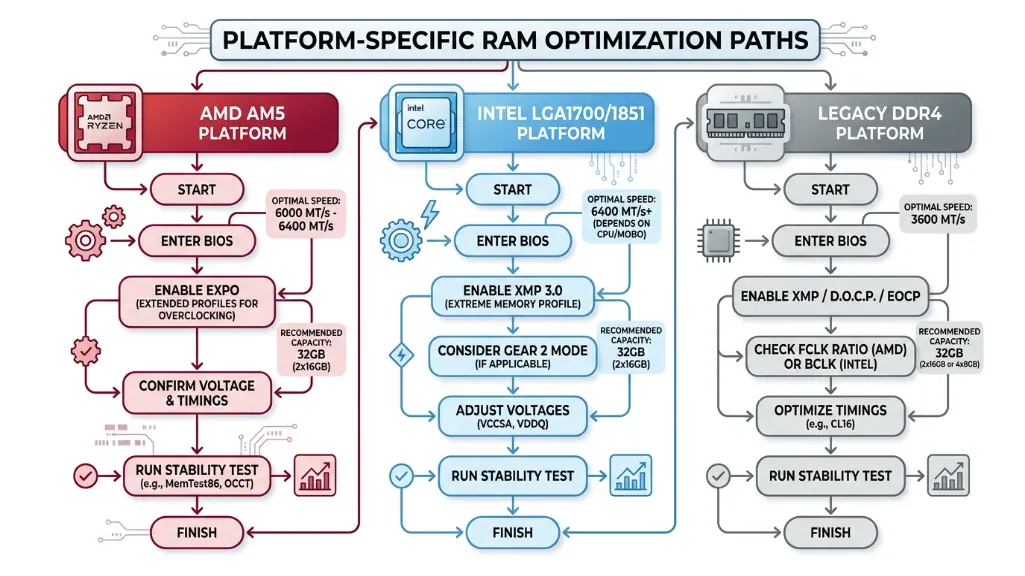
Platform specific sweet spots
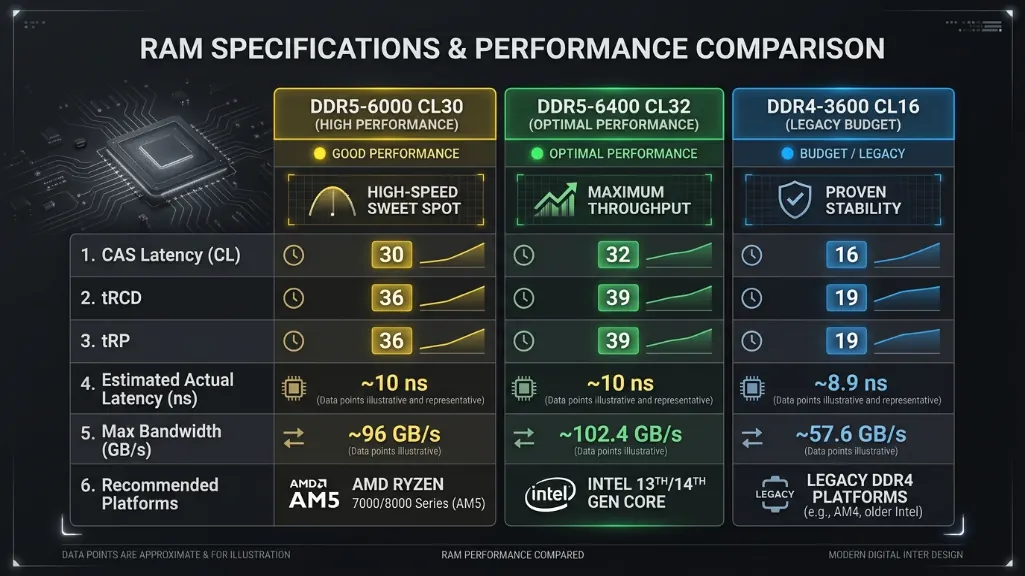
AMD ryzen 7000/9000 (AM5): the magic number is DDR5-6000 CL30. going faster doesn’t help much because of how AMD’s infinity fabric works, don’t waste money on DDR5-7200 kits for AM5.
intel 13th/14th/15th gen: intel scales better with higher speeds. DDR5-6400 to 7200 works well, but 6000-6400 is the sweet spot for price/performance.
DDR4 systems (older builds): DDR4-3600 CL16 is still competitive and way cheaper than DDR5 right now. if you’re on AM4 or intel 10th/11th gen, stick with it.
here’s a comparison table:
| platform | optimal speed | optimal timing | why |
|---|---|---|---|
| AMD AM5 | DDR5-6000 | CL30 | 1:1 infinity fabric sync |
| intel 13th/14th gen | DDR5-6400 | CL32 | best price/performance |
| intel 15th gen | DDR5-6400-7200 | CL32-34 | scales with speed |
| AM4 ryzen 5000 | DDR4-3600 | CL16 | proven sweet spot |
| intel 10th/11th | DDR4-3600 | CL16 | platform limit |
Windows tweaks that actually work
ISLC: the stutter fix nobody talks about
windows has this thing called “standby memory” where it caches recently used data, great in theory, terrible in practice, when games need that RAM, windows panics and dumps the cache, causing massive stutters.
intelligent standby list cleaner (ISLC) fixes this by clearing standby memory before it becomes a problem. it’s from the same developer who made display driver uninstaller, so it’s legit.
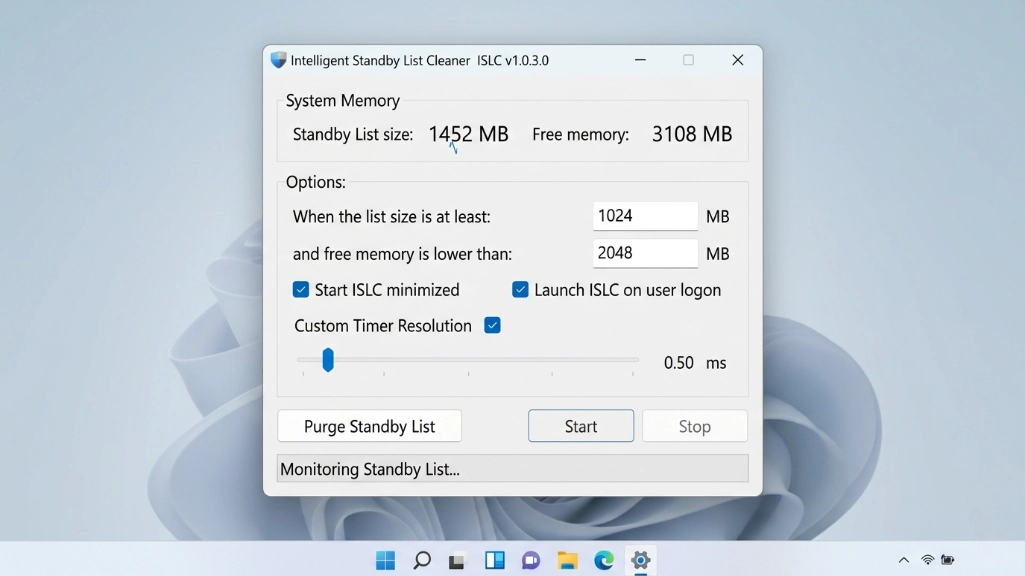
setup for 16GB systems: download ISLC from wagnardsoft.com, run it as administrator. set “the list size is at least” to 1024 MB and “free memory is lower than” to 2048 MB. check the boxes for “start ISLC minimized” and “launch on user logon.”
for 32GB systems: use 8192 MB and 4096 MB instead.
the difference is night and day on 16GB systems. stuttering in games like escape from tarkov or warzone basically disappears.
Process lasso: CPU priority done right
process lasso automatically manages which programs get CPU priority. when you’re gaming, it temporarily lowers the priority of chrome, discord, and windows update so they can’t steal CPU cycles from your game.
the “ProBalance” feature works automatically just install it and forget it. for hybrid CPUs (intel 12th gen+), you can also lock games to performance cores and background apps to efficiency cores.
download it from bitsum.com. the free version is fine. once installed, enable the “bitsum highest performance” power plan from the main menu.
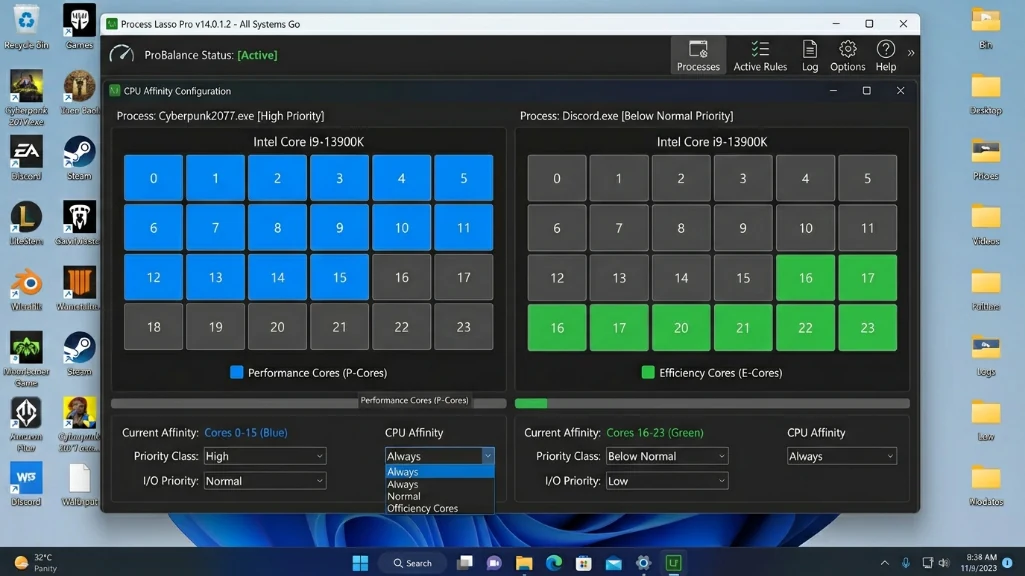
expected result: 3-8% smoother frame times in CPU-bound scenarios, way better multitasking.
Testing your results
Before and after benchmarking
don’t trust placebo. actually measure your performance.
step 1: before making any changes, run a built in benchmark in 2-3 games. cyberpunk 2077, shadow of the tomb raider, and forza horizon 5 all have good ones. write down your average FPS and 1% lows.
step 2: enable XMP/EXPO, reboot, run the same benchmarks.
step 3: if you added a second RAM stick for dual-channel, benchmark again.
step 4: after installing ISLC and process lasso, run one more round.
use MSI afterburner with rivatuner to monitor FPS, frame time, and 1% lows during actual gameplay. the frame time graph should be way smoother after optimization.
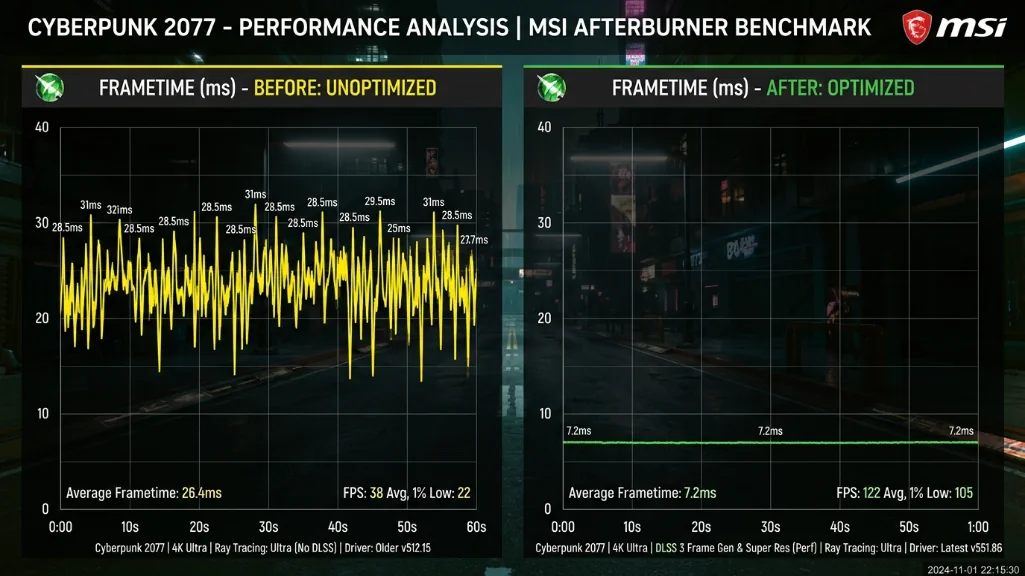
i’ve done this test on probably a dozen different systems now, and the typical gains on badly configured setups are solid: around 10-25% improvement in 1% lows, 5-15% average FPS boost in CPU-bound titles. some outlier cases hit higher, but that’s the realistic range for most people.
Best RAM settings for FPS by platform
AMD Ryzen 7000/9000 Series
optimal config: DDR5-6000 CL30, 32GB dual-channel
don’t buy faster than 6000 for ryzen. the infinity fabric doesn’t scale past that, and you’re wasting money. X3D chips especially see zero benefit from higher speeds.
enable EXPO in BIOS (AMD’s version of XMP), leave everything else on auto unless you’re an extreme overclocker.
Intel 13th/14th gen
optimal config: DDR5-6400 CL32, 32GB dual-channel
intel scales a bit better with higher speeds than AMD, but 6400 hits the sweet spot. you can push 7200+ if you want, but the gains are minimal for the extra cost.
enable XMP profile 1, you’re done.
Budget DDR4 systems
optimal config: DDR4-3600 CL16, 16GB dual channel
if you’re on AM4 or intel 10th/11th gen, DDR4 3600 is still competitive. it’s also way cheaper than DDR5 in 2026’s insane market.
used DDR4 is dirt cheap right now compared to new DDR5. if you’re on a tight budget, upgrading from 2666 to 3600 dual-channel will transform your gaming experience.
The bottom line
RAM optimization is free performance sitting right there in your BIOS. enable XMP/EXPO, verify dual-channel is active, and install ISLC if you’re on 16GB or less. that’s 30 minutes of work for potentially significant FPS gains in CPU limited scenarios.
with RAM prices completely insane right now, optimizing what you already have isn’t optional anymore. expensive new RAM won’t help if you haven’t enabled XMP. a single 32GB stick won’t beat 2x8GB dual channel.
start with the free stuff XMP, dual-channel verification, windows tweaks. benchmark before and after. if you’re still bottlenecked after that, then consider upgrading hardware.
but honestly? most people never get past step one. they buy expensive RAM and run it at stock speeds. don’t be that person.
fix your RAM settings, watch your frame times smooth out, and save the GPU upgrade money for when prices aren’t completely ridiculous.
Pingback: DDR4 vs DDR5 for Gaming: Performance Differences - Fragtrix