

My gaming PC was hitting 95°C during Cyberpunk sessions. Fans screaming like a jet engine. Performance tanking every 20 minutes. I thought my CPU was dying.
Turned out I just needed 15 minutes and a can of compressed air. The temperature dropped 18 degrees.
If your CPU is running hot, you’re probably panicking about expensive repairs or hardware replacements. I’ve been there. But here’s what nobody tells you upfront: most overheating problems have stupidly simple fixes that cost almost nothing.
Let me walk you through exactly what works.
What temperature is actually dangerous
Before you start fixing things, you need to know if you actually have a problem. I wasted hours “solving” temperatures that were completely normal.
Here’s the reality for modern CPUs in 2026:
| Situation | Normal Temperature | You Have a Problem |
|---|---|---|
| Doing nothing (idle) | 30-45°C (86-113°F) | Above 50°C |
| Gaming or heavy work | 65-85°C (149-185°F) | Above 90°C |
| Stress testing | 80-95°C short burts OK | Sustained 95°C+ |
Your CPU will automatically throttle itself at around 95-105°C depending on the model. That’s the built-in safety mechanism preventing permanent damage. If you’re hitting that point regularly, you need to act.
What the symptoms actually mean
Different problems show different warning signs:
| Symptom | Likely Cause | Quick Test |
|---|---|---|
| Sudden temp spike (last week) | Dust buildup or fan failure | Open case, look for dust |
| Gradual increase (months) | Thermal paste drying out | Check how old your PC is |
| High temps from day one | Cooler not mounted properly | Reseat the cooler |
| Hot + loud fans constantly | Too much background CPU load | Check Task Manager |
| Temps fine but PC crashes | Could be other issue | Not temperature related |
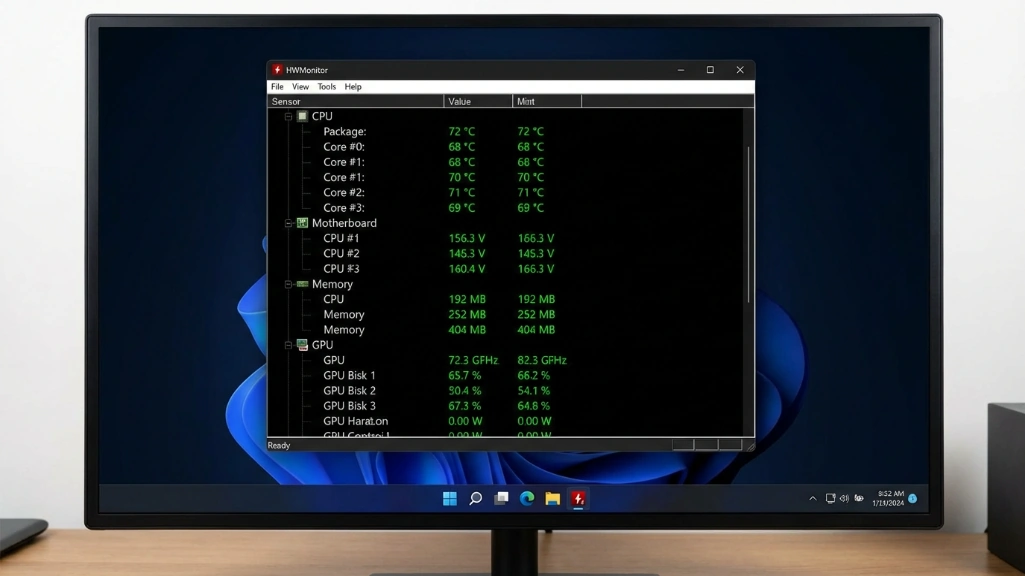
I use HWMonitor to check temperatures. It’s free, takes 30 seconds to install, and shows you exactly what’s happening. Download it, run it for five minutes while doing normal stuff, then check your numbers against that table.
If you’re in the problem zone, keep reading.
The dust problem everyone ignores
Look, I know you want me to tell you about some advanced BIOS tweak or liquid nitrogen cooling setup. But the honest answer to most overheating problems is way more boring than that.
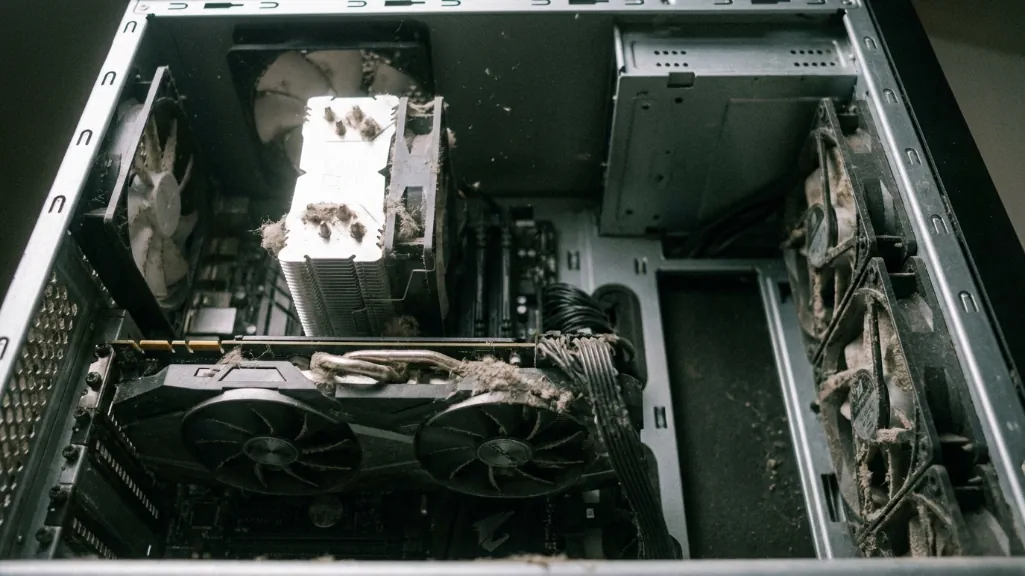
It’s dust.
I ignored this for two years on my main build. Temperatures kept creeping up. Started at 65°C under load, then 72°C six months later, then 78°C. I kept thinking it was something complicated. Downloaded monitoring tools, stressed over fan curves, considered buying a new cooler.
Then my friend came over, opened my case, and laughed. There was a solid quarter-inch layer of dust coating my CPU heatsink. You could barely see the fins anymore.
Fifteen minutes with a can of compressed air later, I was back to 63°C. I’d been stressing over temperatures for months because I couldn’t be bothered to look inside my PC.
The thing about dust is it’s gradual. You don’t notice it happening. Your fans compensate by spinning faster. They get louder, but you adjust to the noise. Until eventually they can’t keep up anymore and your CPU starts cooking itself.
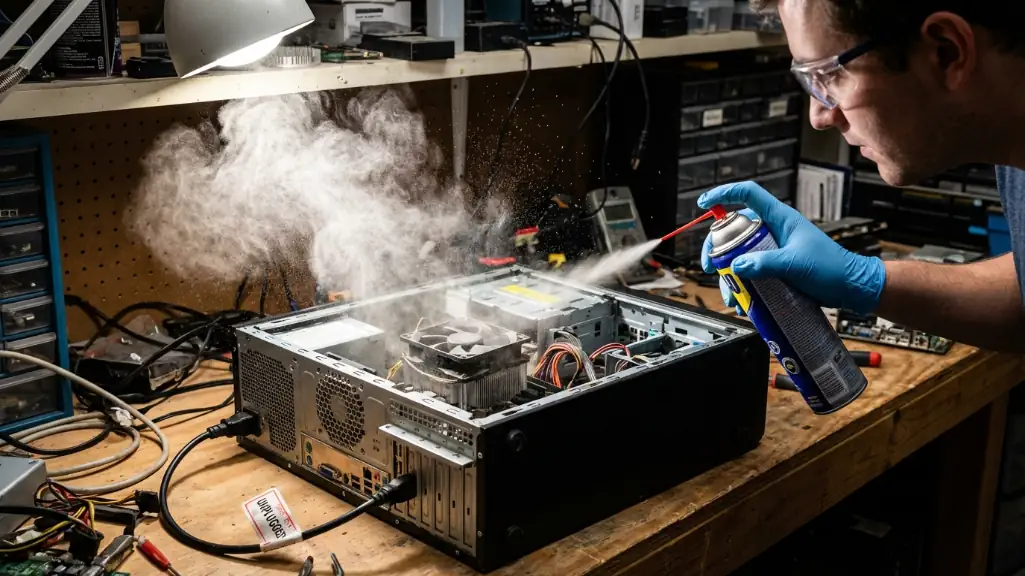
Grab a can of compressed air. They’re eight bucks at Best Buy. Turn off your PC, unplug it, wait a minute for the power to drain. Pop the side panel off – two thumbscrews on the back of most cases.
Now actually look at your CPU cooler. If you see any dust between those metal fins, hit it with short bursts of air. Don’t hold the trigger down for ten seconds straight – you’ll freeze the can and make everything worse. Short bursts work better anyway.
One thing I learned the hard way: hold your fans still with your finger while you spray them. First time I cleaned my PC, I let the GPU fans spin freely. The compressed air spun one so fast it wrecked the bearing. Fan started making this grinding noise every time it ramped up. Had to replace it.
Also don’t use a vacuum. I tried that once too. Shocked myself on a capacitor and nearly had a heart attack. Compressed air only.
I clean my PC every three months now. Set a reminder on my phone. Takes ten minutes. Keeps temperatures where they should be. If you live somewhere dusty or have pets, you might need to do it more often. My friend with three cats cleans his every month.
When thermal paste is the problem
If dust wasn’t it, thermal paste probably is. Especially if your PC is over two years old.
I didn’t know this was a thing until my temps started climbing on a build that was spotless inside. No dust anywhere. Fans working fine. Still hitting 88°C in Cinebench when it used to max out at 72°C.
Turns out thermal paste degrades. It’s not permanent. The heat cycles from your CPU literally dry it out over time. Eventually it stops conducting heat properly and your temperatures creep up.
My brother’s PC had paste that looked like cracked desert mud when we pulled the cooler off. He’d been running that thing for four years without touching it. Idle temps were 52°C. After fresh paste? 36°C idle. We just sat there watching HWMonitor drop.
You need thermal paste – Arctic MX-6 is ten bucks and works great, or Noctua NT-H2 if you want something fancier. Grab isopropyl alcohol (90% or higher) and coffee filters for cleaning. Don’t use paper towels, they leave lint.
Remove your CPU cooler. This is different for every cooler but mine had four spring-loaded screws. Twist the cooler gently before you pull it straight up – the paste creates suction and you don’t want to rip the CPU out of its socket. Yes, that can happen. No, I didn’t do it, but I watched a YouTube video where someone did.
Clean both surfaces with the alcohol until they’re mirror-finish clean. I went through like six coffee filters on my first attempt because I kept seeing tiny smudges. You want zero residue. Zero streaks. Perfectly clean metal.
The application method everyone argues about: I just put a pea-sized dot in the dead center of the CPU. That’s it. Don’t spread it with your finger or a credit card like old guides tell you. The pressure from remounting the cooler spreads it evenly. Spreading it manually creates air bubbles, and air bubbles kill thermal transfer.
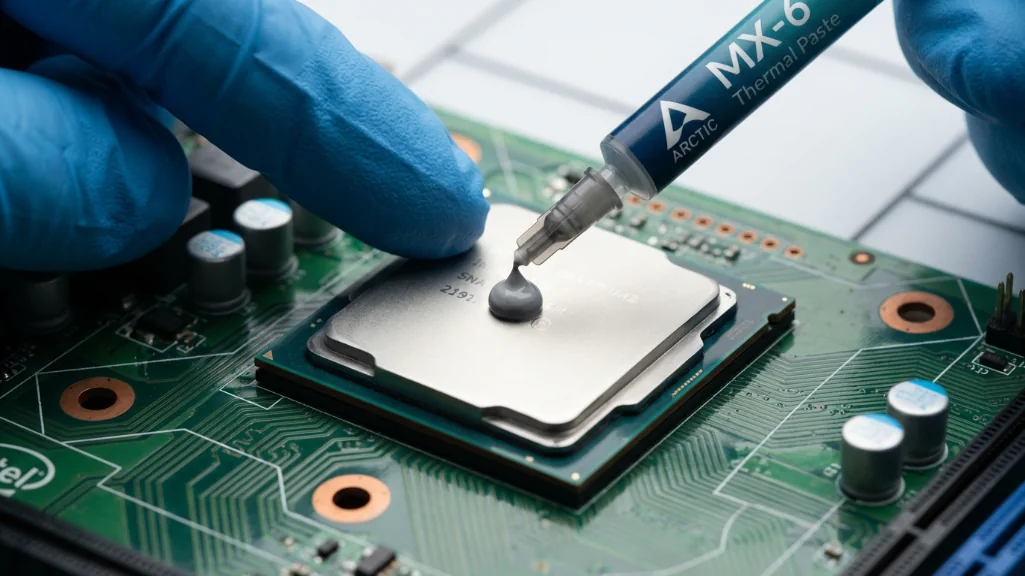
Remount the cooler. Tighten the screws in a cross pattern – top left, bottom right, top right, bottom left. Do it gradually. Don’t crank one screw all the way down then move to the next. That bends the mounting and creates uneven pressure.
Boot up. Check temps. If you did it right, you should see improvement immediately. My temps dropped 14 degrees the second I got into Windows.
The mistakes I made so you don’t have to
First time I did this, I used too much paste. Thought more would be better. The paste squeezed out the sides when I mounted the cooler. Made a mess on the motherboard. Temps were actually worse than before because I’d created this thick insulating layer.
Second attempt, I didn’t clean the old paste thoroughly enough. Just wiped it with a dry cloth. Left a thin film of old crusty paste under the new stuff. Wondered why my temps barely improved.
Third time I got it right. Clean surfaces, pea-sized dot, even mounting pressure. That’s when I finally saw the big temperature drop everyone talks about.
The other mistake people make is not seating the cooler fully. If those screws aren’t tight, if the mounting isn’t clicked in properly, you’ll have a gap. I’ve seen people with perfect paste application running 20 degrees too hot because they didn’t push the cooler down hard enough.
Quick wins that cost nothing
Sometimes you don’t even need to open your PC. These software fixes take five minutes and can actually make a difference.
Here’s how the different fixes stack up if you’re trying to figure out where to start:
| Fix | Time Needed | Difficulty | Typical Results | Cost |
|---|---|---|---|---|
| Close background apps | 2 minutes | Easy | 5-10°C cooler | Free |
| Clean external dust | 10 minutes | Easy | 5-15°C cooler | $8 (compressed air) |
| Improve airflow/placement | 5 minutes | Easy | 3-8°C cooler | Free |
| Adjust power settings | 3 minutes | Easy | 5-10°C cooler | Free |
| Deep clean inside PC | 20 minutes | Medium | 10-20°C cooler | $8 |
| Replace thermal paste | 45 minutes | Medium | 10-25°C cooler | $12 |
| Upgrade CPU cooler | 1 hour | Medium | 15-30°C cooler | $35-120 |
Start from the top and work down. Most people never need to go past thermal paste.
Close the resource hogs
Hit Ctrl+Shift+Esc to open Task Manager. Look at your CPU usage percentage. If you’re sitting at 40% with nothing open, something’s wrong.
I found a crypto miner on my friend’s PC this way. He called me over because his temps were insane and his PC sounded like it was about to take off. Task Manager showed 80% CPU usage at idle. Malwarebytes found the virus, we removed it, temps dropped 25 degrees on the spot.
More common problems: Chrome with 47 tabs you forgot about, Discord and Spotify auto-starting every boot, Windows Update stuck in a loop downloading the same patch forever, three different game launchers updating simultaneously in the background.
Close what you’re not using. Go to the Startup tab in Task Manager and disable stuff you don’t need launching automatically. Run Malwarebytes if anything looks sketchy.
Windows power settings fix
Windows sometimes runs your CPU at full speed constantly even when you’re just scrolling Reddit. Generates unnecessary heat for no reason.
Control Panel → Power Options → Change plan settings → Change advanced power settings. Under “Processor power management,” change minimum processor state from 100% to 5%.
This lets your CPU actually idle when it’s doing nothing intensive. My system dropped 6 degrees from this alone. Your CPU will still boost to full speed when you need it – this just stops it from running at max frequency when you’re literally doing nothing.
The airflow fixes nobody mentions
Your case airflow matters more than most people realize. I’ve seen expensive coolers perform poorly because the case design fights against them.
Quick airflow check:
| Airflow Element | Good Setup | Bad Setup |
|---|---|---|
| Front fans | Pulling air in | Facing wrong way |
| Rear/top fans | Pushing air out | All pulling in |
| PC placement | 10cm clearance all sides | Against wall or in cabinet |
| Cables | Tucked behind motherboard | Blocking fans |
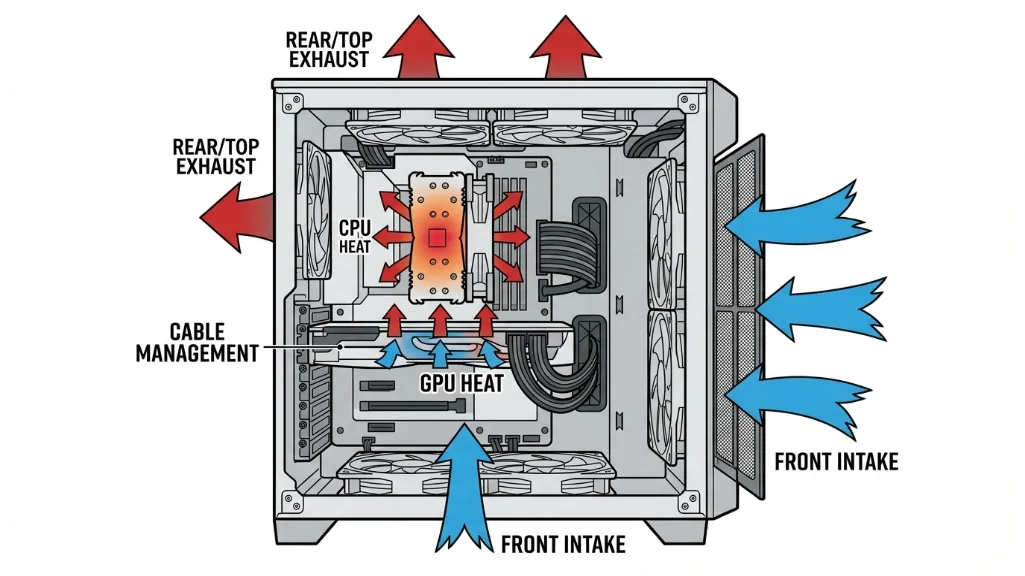
Stand in front of your PC while it’s running. Put your hand near the front – you should feel cool air being pulled in. Put your hand near the back/top – you should feel warm air being pushed out.
If that’s backwards, your fans are installed incorrectly. The label side usually faces the direction of airflow.
For laptops, this gets simpler: don’t use it on your bed or couch. Soft surfaces block the intake vents. Use a hard desk surface, or better yet, get a $25 laptop cooling pad with built-in fans.
When you actually need to spend money
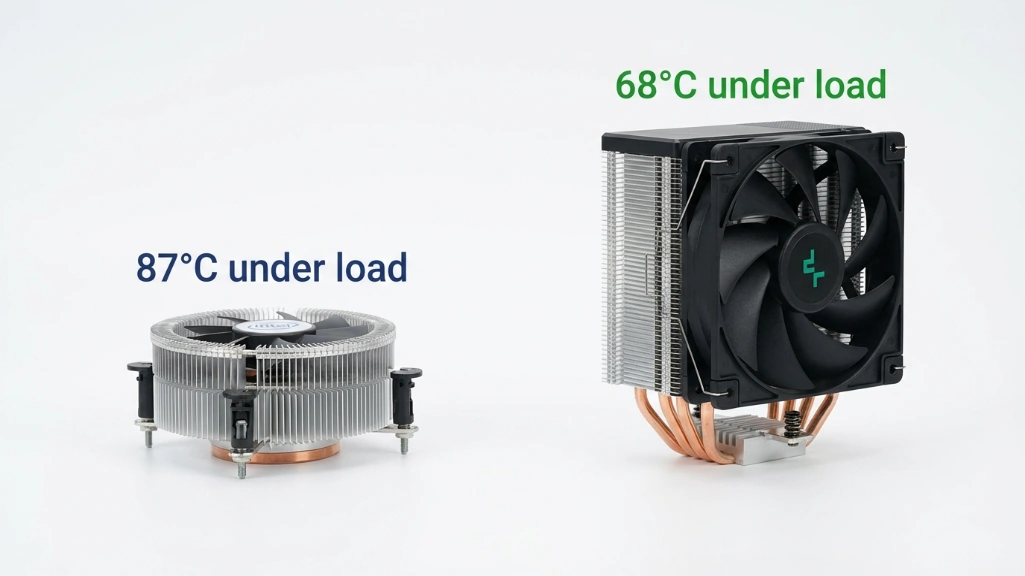
Most of the time, you can fix CPU temperatures without buying anything. But sometimes the stock cooler just isn’t enough for your CPU.
I upgraded from the Intel stock cooler to a $35 tower cooler on my i5 build. Temperatures under load dropped from 87°C to 68°C. Same CPU, same workload, 19 degree difference.
Here’s when to consider a cooler upgrade:
Your CPU runs hot by design. High-end CPUs like the i9-14900K or Ryzen 9 7950X generate massive heat. Stock coolers can’t handle them properly. If you’re consistently hitting 90°C+ with a clean system and fresh paste, your cooler is outmatched.
You want your PC quieter. Bigger coolers with larger fans run slower and quieter while cooling better. The noise reduction alone was worth the upgrade for me.
You’re overclocking. If you’ve tweaked voltage or clock speeds in BIOS, you need better cooling. Non-negotiable.
Budget tower air coolers ($30-50) work great for most people. You don’t need a $300 AIO water cooler unless you’re running something extreme.
Tools that actually help
You can’t fix temperature problems if you can’t see what’s happening. I’ve tried probably fifteen different monitoring programs over the years. Most are either garbage or way too complicated.
HWMonitor is what I use for quick checks. Launch it, see your temps in a simple list. That’s it. Current temperature, minimum since you opened the program, maximum since you opened it. Three numbers. Done.
It’s not fancy. The interface looks like it’s from 2008. But when I want to know “is my CPU running hot right now,” I don’t need fancy. I need those three numbers, and HWMonitor shows them without any bullshit configuration menus or premium upsells.
HWiNFO64 is better if you’re the type who wants to see everything. And I mean everything – per-core temps, voltages, clock speeds, fan RPMs, power draw, the whole deal. I use this when I’m actually troubleshooting something specific.
Fair warning: the interface is overwhelming as hell when you first open it. There are like 47 different temperature readings for your CPU alone. Took me twenty minutes to figure out which one I actually needed to watch. But once you find your CPU package temp and set up the sensors window how you like it, it’s incredibly useful.
MSI Afterburner is what I run when gaming. It can overlay your temps on screen so you see CPU and GPU temps while you’re playing. No alt-tabbing, no second monitor needed. Just a little readout in the corner showing you if something’s cooking itself.
Works with any GPU brand despite the MSI name. I’m running an AMD card and it works fine. The on-screen display is why I keep it installed – everything else it does I don’t really use.
People asked me about Core Temp and Open Hardware Monitor too. Core Temp is fine but it only does CPU temps. Why would I install a separate program for that when HWMonitor shows CPU and GPU and everything else? And Open Hardware Monitor hasn’t been updated in forever, so newer hardware doesn’t always show up correctly.
Just pick one and use it. Download HWMonitor, let it run while you do normal stuff for a day, and you’ll see your temperature patterns. That’s all you need.
What I’d do if I were you
Start with dust. Seriously. Open your case and look. Takes five minutes to check, fifteen to clean if you find some. This fixed my overheating problem on three different occasions because I kept forgetting to do it regularly.
If that doesn’t work, fresh thermal paste is your next move. Especially if your PC is over two years old. I put this off for way too long on my old build because I thought it sounded complicated. It’s not. It’s just careful cleaning and putting a blob of goop on your CPU. Forty-five minutes and twelve bucks.
Only start thinking about hardware upgrades after you’ve tried both of those. And honestly, most people never need to upgrade anything. My gaming rig went from throttling at 94°C to maxing out at 76°C under the same workload. Same CPU, same cooler, same everything. Just cleaned the dust and replaced paste that had turned into concrete.
The worst thing you can do is panic and start buying stuff. I almost bought a $280 AIO cooler when my temps were hitting 92°C. Would’ve been a complete waste. The problem was a quarter-inch of dust on my heatsink and thermal paste from 2019 that looked like cracked mud.
Download a monitoring tool, clean your PC, maybe replace the thermal paste if it’s old. See where you land after that. You’ll probably be fine.
And if you’re not fine after all that – if you’ve cleaned everything, fresh paste didn’t help, and your temps are still cooked – then yeah, you might actually need better cooling or there’s a hardware problem. But try the simple stuff first.
That’s how I’d approach it.
Pingback: How to Fix Low FPS in Games: Full Checklist - Fragtrix
Pingback: Best Fan Setup Gaming PC: Airflow Guide - Fragtrix